In this second installment of The Road to Whitney Series, I want to go into more detail about the Mountaineer's Route in preparation for both my solo single day trip and the overnight trip I am planning with my dad. In addition to the route, I will cover the training required and my training plan in more detail. And last I put together a preliminary gear list for both trips. If you missed it, be sure to check out The Road to Whitney 1: The Start of It All.
The Route
Route Overview
The Mountaineer's Route is the second most popular route for climbing Mt. Whitney; second only to the famed "Whitney Main Trail". In fact, John Muir made his first ascent of Mt. Whitney up what is today recognized as the Mountaineer's Route; the main trail had yet to be established. While the Main trail is a well marked and heavily maintained path leading all the way from Whitney Portal to the summit, the Mountaineer's Route is more accurately described as a use trail that extends about 60% of the way to the summit. The majority of the Mountaineer's Route is actually the North Fork Lone Pine Creek Trail and it is not until you reach main massif of Mt. Whitney itself that you are truly on the Mountaineer's Route. The North Fork Trail and Mountaineer's Route see significant traffic each year and are in no way hard to follow assuming you know where you are going. I still hear about a few people (OK, more than a few) each year who manage to get lost along the way and end up returning to the portal disappointed. In order to avoid such a fate, it is important to thoroughly study the route to ensure you take the proper path. Failure to stay on the correct line can result in you: getting lost, or worse yet, land you in a dangerous situation where difficult and technical climbing is required. So how do people get lost if there is a use trail? As I mentioned earlier, the use trail covers about 60% of the climb, with the remaining 40% being either off trail scrambling or climbing. Many people approach the Mountaineer's Route with little respect and assume (incorrectly) that it is as easy to follow as the main trail. But don't despair yet, as long as you know how to navigate to each major landmark and which line to take when you arrive, there is much less chance of getting lost. To help familiarize you with the major landmarks along the route, I will explain each difficult or technical section in detail. All of the major milestones and landmarks are indicated on the main map shown below.
Major Landmarks
1. Main Trail Turn off
Both the Mountaineer's Route and the Whitney Main Trail leave from the Mt. Whitney Portal store and campground located above Lone Pine and both use the same trail head. However, once you set off, the turn off for the Mountaineer's Route is less than a mile up the trail so you will need to be on your toes. If you miss the sign, you will be in for some backtracking to regain the correct trail. Fortunately, this turnoff is outside of the permit zone so you won't be fined if you head too far up the main trail.
2. Ebersbacher Ledges
The Ebersbacher Ledges are the first major obstacle you will encounter along the route. The route up the ledges was pioneered in 1953 by Dale and Frances Ebersbacher as a way to bypass the thick and nearly impassable alder and aspen trees that choke the narrow canyon Lone Pine Creek follows. A more accurate description of hiking through the trees I have heard is that it is more akin to tunneling than walking. The ledges bypass requires you to scramble up a 3rd class rock flake and traverse along several narrow ledges that eventually switch back up to a larger ledge that allows you to walk along to the saddle above the mess of trees. The main difficulty of the ledges is making sure you start in the right location. Once following the correct ledge, there are numerous rock cairns marking the turns you need to take so it is not too hard to stay on track. Once you get high enough, the route doubles back onto a much wider ledge with some trees and you simply need to traverse to the west back to the creek.
3. Upper Boy Scout Lake
The turn off at Upper Boy Scout Lake is not technically difficult but is important because it is where you will be leaving the Lone Pine Creek Trail and continuing on the Mountaineer's Route proper. The normal route involves turning off and heading south up a fairly loose slope to the next higher plateau. Most people prefer to follow the creek for as long as possible before turning up the slope. There are numerous cut-offs that traverse the loose slope, but these involve significant bush whacking and some deep sand so they are not as popular. At this point, if you need water you can instead continue on up to Upper Boy Scout Lake itself for water (be sure to filter and treat the water!) before continuing on. Rather than backtracking, you can take a cutoff across the slope to save time, but this involves a loose slope, so proceed with caution. This second option is outlined in red.
4. The Notch
The Notch is by far the most physically challenging portion of the entire climb, despite its unimposing sounding name. This portion of the climb involves ascending nearly 2000 ft. in a narrow, rock or snow filled gully up the north east face of the mountain. Depending on the time of year it is attempted, conditions can range from packed snow to endless loose rock and gravel. When the gully is filled with snow, ice axe and crampons are required but the climbing is reasonably pleasant. In late summer when all the snow has melted, the climb is a much different animal requiring rock hopping and navigation of endless loose rock. Any late summer climber should be prepared for sliding back as much as climbing up; picking the correct line here is very important. Due to the sudden altitude gain, this is often where climbers get hit hardest with altitude sickness. For the purposes of both climbs, I will need to ensure that I summit and start back down with plenty of daylight as The Notch is awful to descend in the dark. In all seasons, a rock helmet should be considered mandatory.
5. The Final 400
The Final 400 is imaginatively named as it is the Final 400 feet of climbing before you reach the summit plateau. In true mountaineering fashion, Mt. Whitney saves the best for last. The Final 400 is a Class 3 section requiring scrambling and some climbing to reach the summit. While it is the most technically difficult climbing of the route, it does not pose too big a challenge in the summer. In winter, this section is notoriously icy and dangerous, but summertime conditions allow for climbing without the need for ropes or gear. In fact, the most difficult portion of the Final 400 is the first 8 feet which requires you to climb up a an awkward rock shelf. After the initial shelf is cleared, you simply need to weave back and forth along the rock ledges to the summit. Below I have outlined one of the more common approaches, though there are endless variations. Once you reach the top of the Final 400, you are on the summit plateau a short distance from the summit hut.
Training
So, what is the best way to train for climbing mountains? The answer is quite simply, "by climbing mountains." Unfortunately, most people (myself included) do not have the time or the easy access to large mountains to reliably train this way. What this means is that we have to come up with an approach to training that works all the same muscle groups and mimics the motions and strains you will be placing on your body.
To make sure I am properly prepared for climbing, I will be focusing my training in three main areas listed below:
Cardiac Fitness
Being in good cardiac shape is the most important area to be fit while climbing at high altitude. Not only do I need to worry about the physical difficulty of climbing the mountain, but I need to consider the effects of lower oxygen on my system. At sea level, there is roughly 20.9% oxygen by volume in the air I breathe, but as the altitude increases, the oxygen available decreases steadily. By the time I reach the summit of Mt. Whitney, there will only be 57% as much oxygen as there would be at sea level, meaning every breath will only have about 11.9% oxygen by volume in it. In short, this means I will need to take two breaths to get the same amount of oxygen I would in a single breath while training at sea level. Because of this, I need to be in great shape to allow me to function well with a heavily increased heart rate.
Leg and Core Strength
While working on leg and core strength might seem like a no-brainer to some, I often find that people don't always fully understand just how to go about training these muscles for mountaineering. For most people, when they think increasing leg strength they will naturally think of running paired with leg presses in the gym. However, both of these workout routines aren't well suited to making you a strong mountaineer. While running is a good way to build cardiac strength, it won't offer much help while climbing a mountain. Running strengthens muscle groups best used to propel you over flat ground with your weight directly above your hips, but while climbing steep mountain slopes, you will be hard pressed to find this motion being required. As for leg presses, they build large, fast twitch type muscles that are great for lifting up a large weight a few times. Unfortunately, mountaineering doesn't require you to lift a heavy set of weights a few reps then rest; it requires you to do it hundreds and hundreds of times in a row. To best prepare myself, I plan to leave both training methods out of my training plan and focus on the typical "stair stepping" motion which is what is most commonly found while mountaineering. This strengthens the muscles that are best for supporting me while my center of gravity is forward of my hips and my upper torso is leaning forward. This also strengthens my core which will allow me to balance and support a heavy pack load on uneven and steep slopes. I have found that hanging leg lifts paired with lunges and squats wearing a weighted pack are best for strengthening the muscles needed. Of course, there are many other ways to strengthen the correct muscle groups than I use. Remember our mantra when thinking of alternate training, "The best way to train for climbing mountains is by climbing mountains." Always tailor the training method to the end use.
Endurance
Training for endurance is by far the most straightforward of the three focuses to my training, but also the most difficult to do properly. The single day summit attempt I'm planning will involve at least 10 hours of continuous effort to complete. To best prepare for a long effort I will be using both long duration hikes and interval training on my bike to boost my overall endurance. I plan to use a bi-weekly fast hike of around 10 miles to condition my legs to long distances at a fast pace. Interval training is a technique where you alternate between high intensity workouts and resting. My goal with interval training is twofold: it will boost my recovery rate and increase my lactic threshold. Both of these factors together will allow me to recover from hard hiking faster and go longer without getting sore.
In the previous installment of this series, The Road to Whitney 1: The Start of It All I laid out an initial training plan shown below:
The Route
Route Overview
The Mountaineer's Route is the second most popular route for climbing Mt. Whitney; second only to the famed "Whitney Main Trail". In fact, John Muir made his first ascent of Mt. Whitney up what is today recognized as the Mountaineer's Route; the main trail had yet to be established. While the Main trail is a well marked and heavily maintained path leading all the way from Whitney Portal to the summit, the Mountaineer's Route is more accurately described as a use trail that extends about 60% of the way to the summit. The majority of the Mountaineer's Route is actually the North Fork Lone Pine Creek Trail and it is not until you reach main massif of Mt. Whitney itself that you are truly on the Mountaineer's Route. The North Fork Trail and Mountaineer's Route see significant traffic each year and are in no way hard to follow assuming you know where you are going. I still hear about a few people (OK, more than a few) each year who manage to get lost along the way and end up returning to the portal disappointed. In order to avoid such a fate, it is important to thoroughly study the route to ensure you take the proper path. Failure to stay on the correct line can result in you: getting lost, or worse yet, land you in a dangerous situation where difficult and technical climbing is required. So how do people get lost if there is a use trail? As I mentioned earlier, the use trail covers about 60% of the climb, with the remaining 40% being either off trail scrambling or climbing. Many people approach the Mountaineer's Route with little respect and assume (incorrectly) that it is as easy to follow as the main trail. But don't despair yet, as long as you know how to navigate to each major landmark and which line to take when you arrive, there is much less chance of getting lost. To help familiarize you with the major landmarks along the route, I will explain each difficult or technical section in detail. All of the major milestones and landmarks are indicated on the main map shown below.
 |
| The Mountaineer's Route |
Major Landmarks
1. Main Trail Turn off
Both the Mountaineer's Route and the Whitney Main Trail leave from the Mt. Whitney Portal store and campground located above Lone Pine and both use the same trail head. However, once you set off, the turn off for the Mountaineer's Route is less than a mile up the trail so you will need to be on your toes. If you miss the sign, you will be in for some backtracking to regain the correct trail. Fortunately, this turnoff is outside of the permit zone so you won't be fined if you head too far up the main trail.
 |
| Image Courtesy of timberlinetrails.net |
2. Ebersbacher Ledges
The Ebersbacher Ledges are the first major obstacle you will encounter along the route. The route up the ledges was pioneered in 1953 by Dale and Frances Ebersbacher as a way to bypass the thick and nearly impassable alder and aspen trees that choke the narrow canyon Lone Pine Creek follows. A more accurate description of hiking through the trees I have heard is that it is more akin to tunneling than walking. The ledges bypass requires you to scramble up a 3rd class rock flake and traverse along several narrow ledges that eventually switch back up to a larger ledge that allows you to walk along to the saddle above the mess of trees. The main difficulty of the ledges is making sure you start in the right location. Once following the correct ledge, there are numerous rock cairns marking the turns you need to take so it is not too hard to stay on track. Once you get high enough, the route doubles back onto a much wider ledge with some trees and you simply need to traverse to the west back to the creek.
 |
| View of Ebersbacher Ledges Route looking north |
3. Upper Boy Scout Lake
The turn off at Upper Boy Scout Lake is not technically difficult but is important because it is where you will be leaving the Lone Pine Creek Trail and continuing on the Mountaineer's Route proper. The normal route involves turning off and heading south up a fairly loose slope to the next higher plateau. Most people prefer to follow the creek for as long as possible before turning up the slope. There are numerous cut-offs that traverse the loose slope, but these involve significant bush whacking and some deep sand so they are not as popular. At this point, if you need water you can instead continue on up to Upper Boy Scout Lake itself for water (be sure to filter and treat the water!) before continuing on. Rather than backtracking, you can take a cutoff across the slope to save time, but this involves a loose slope, so proceed with caution. This second option is outlined in red.
 |
| Upper Boy Scout Lake turn off looking west |
4. The Notch
The Notch is by far the most physically challenging portion of the entire climb, despite its unimposing sounding name. This portion of the climb involves ascending nearly 2000 ft. in a narrow, rock or snow filled gully up the north east face of the mountain. Depending on the time of year it is attempted, conditions can range from packed snow to endless loose rock and gravel. When the gully is filled with snow, ice axe and crampons are required but the climbing is reasonably pleasant. In late summer when all the snow has melted, the climb is a much different animal requiring rock hopping and navigation of endless loose rock. Any late summer climber should be prepared for sliding back as much as climbing up; picking the correct line here is very important. Due to the sudden altitude gain, this is often where climbers get hit hardest with altitude sickness. For the purposes of both climbs, I will need to ensure that I summit and start back down with plenty of daylight as The Notch is awful to descend in the dark. In all seasons, a rock helmet should be considered mandatory.
 |
| The north east face of Mt. Whitney above Iceberg Lake |
5. The Final 400
The Final 400 is imaginatively named as it is the Final 400 feet of climbing before you reach the summit plateau. In true mountaineering fashion, Mt. Whitney saves the best for last. The Final 400 is a Class 3 section requiring scrambling and some climbing to reach the summit. While it is the most technically difficult climbing of the route, it does not pose too big a challenge in the summer. In winter, this section is notoriously icy and dangerous, but summertime conditions allow for climbing without the need for ropes or gear. In fact, the most difficult portion of the Final 400 is the first 8 feet which requires you to climb up a an awkward rock shelf. After the initial shelf is cleared, you simply need to weave back and forth along the rock ledges to the summit. Below I have outlined one of the more common approaches, though there are endless variations. Once you reach the top of the Final 400, you are on the summit plateau a short distance from the summit hut.
 |
| The Final 400 section from the North |
Training
So, what is the best way to train for climbing mountains? The answer is quite simply, "by climbing mountains." Unfortunately, most people (myself included) do not have the time or the easy access to large mountains to reliably train this way. What this means is that we have to come up with an approach to training that works all the same muscle groups and mimics the motions and strains you will be placing on your body.
To make sure I am properly prepared for climbing, I will be focusing my training in three main areas listed below:
Cardiac Fitness
Being in good cardiac shape is the most important area to be fit while climbing at high altitude. Not only do I need to worry about the physical difficulty of climbing the mountain, but I need to consider the effects of lower oxygen on my system. At sea level, there is roughly 20.9% oxygen by volume in the air I breathe, but as the altitude increases, the oxygen available decreases steadily. By the time I reach the summit of Mt. Whitney, there will only be 57% as much oxygen as there would be at sea level, meaning every breath will only have about 11.9% oxygen by volume in it. In short, this means I will need to take two breaths to get the same amount of oxygen I would in a single breath while training at sea level. Because of this, I need to be in great shape to allow me to function well with a heavily increased heart rate.
 |
| Chart showing decrease in oxygen at altitude compared to sea level |
Leg and Core Strength
While working on leg and core strength might seem like a no-brainer to some, I often find that people don't always fully understand just how to go about training these muscles for mountaineering. For most people, when they think increasing leg strength they will naturally think of running paired with leg presses in the gym. However, both of these workout routines aren't well suited to making you a strong mountaineer. While running is a good way to build cardiac strength, it won't offer much help while climbing a mountain. Running strengthens muscle groups best used to propel you over flat ground with your weight directly above your hips, but while climbing steep mountain slopes, you will be hard pressed to find this motion being required. As for leg presses, they build large, fast twitch type muscles that are great for lifting up a large weight a few times. Unfortunately, mountaineering doesn't require you to lift a heavy set of weights a few reps then rest; it requires you to do it hundreds and hundreds of times in a row. To best prepare myself, I plan to leave both training methods out of my training plan and focus on the typical "stair stepping" motion which is what is most commonly found while mountaineering. This strengthens the muscles that are best for supporting me while my center of gravity is forward of my hips and my upper torso is leaning forward. This also strengthens my core which will allow me to balance and support a heavy pack load on uneven and steep slopes. I have found that hanging leg lifts paired with lunges and squats wearing a weighted pack are best for strengthening the muscles needed. Of course, there are many other ways to strengthen the correct muscle groups than I use. Remember our mantra when thinking of alternate training, "The best way to train for climbing mountains is by climbing mountains." Always tailor the training method to the end use.
Endurance
Training for endurance is by far the most straightforward of the three focuses to my training, but also the most difficult to do properly. The single day summit attempt I'm planning will involve at least 10 hours of continuous effort to complete. To best prepare for a long effort I will be using both long duration hikes and interval training on my bike to boost my overall endurance. I plan to use a bi-weekly fast hike of around 10 miles to condition my legs to long distances at a fast pace. Interval training is a technique where you alternate between high intensity workouts and resting. My goal with interval training is twofold: it will boost my recovery rate and increase my lactic threshold. Both of these factors together will allow me to recover from hard hiking faster and go longer without getting sore.
In the previous installment of this series, The Road to Whitney 1: The Start of It All I laid out an initial training plan shown below:
- Cycling: 4 to 5 days. 25+ miles per ride.
- Hiking, non weighted pack: 1 day every other week. 5-10 miles.
- Stair climbing, weighted pack (10-25 lbs): 3 times per week. 500 vertical ft. equivalent.
- Squats, lunges, and wall sits: 3 times per week. 30 reps each.
- Hang bar leg lifts: 4 times per week. 10-30 reps.
This training regimen has so far been quite effective but as we begin to move into spring I plan to add additional workouts to build upon the athletic base I have built up so far this winter. My dad is (hopefully) following the training plan I created for him, which is quite similar. The new training plan looks something like this:
Fortunately for me, my Whitney climbs only require that I contend with the more mild symptoms of AMS; but even these can be a trip killer as I live at an elevation of around 20ft. On a climb this past year, I ascended too quickly while climbing Mt. Tom Ross in the Sierras and I became fairly disoriented and developed quite a bad headache. All this led me to climb the wrong ridge on the approach to the summit and become temporarily lost; not something that is advisable in the wilderness. Fortunately, I have enough experience with the symptoms of AMS that I immediately aborted my summit attempt once I realized I was in the wrong place and my symptoms were getting worse.
To ensure that I am properly acclimatized for both Whitney trips I plan to use a two part strategy to acclimatize. First, I plan to climb another Eastern Sierra peak name Mt. Dana (13,061 ft.) in the weeks prior to my first trip. The great thing about Mt. Dana is that it is a very short climb (6 miles round trip) which will allow me to summit and get back down quickly. While I certainly won't be properly acclimatized, this climb will give my body a head start on the acclimatization for Whitney and allow me to gauge my overall fitness at altitude. The second phase will involve arriving at the Mt. Whitney portal campground (8,360ft.) and camping for two nights before I climb to the summit. After the first night, I will climb part way up the trail to around 10,000 feet and then descend again for the second night. This should allow my body to acclimatize enough to summit the following day with hopefully minimal altitude symptoms.
- Cycling: 4 to 5 days. 25+ miles per ride.
- Cycling intervals: 3 days. 10x 2 minute reps.
- Hiking, weighted pack: 1 day every other week. 10 miles fast pace.
- Stair climbing, weighted pack (30 lbs): 4 times per week. 800 vertical ft. equivalent.
- Squats, lunges, and wall sits: 4 times per week. 30 reps each.
- Hang bar leg lifts: 4 times per week. 10-30 reps.
Fortunately for me, my Whitney climbs only require that I contend with the more mild symptoms of AMS; but even these can be a trip killer as I live at an elevation of around 20ft. On a climb this past year, I ascended too quickly while climbing Mt. Tom Ross in the Sierras and I became fairly disoriented and developed quite a bad headache. All this led me to climb the wrong ridge on the approach to the summit and become temporarily lost; not something that is advisable in the wilderness. Fortunately, I have enough experience with the symptoms of AMS that I immediately aborted my summit attempt once I realized I was in the wrong place and my symptoms were getting worse.
To ensure that I am properly acclimatized for both Whitney trips I plan to use a two part strategy to acclimatize. First, I plan to climb another Eastern Sierra peak name Mt. Dana (13,061 ft.) in the weeks prior to my first trip. The great thing about Mt. Dana is that it is a very short climb (6 miles round trip) which will allow me to summit and get back down quickly. While I certainly won't be properly acclimatized, this climb will give my body a head start on the acclimatization for Whitney and allow me to gauge my overall fitness at altitude. The second phase will involve arriving at the Mt. Whitney portal campground (8,360ft.) and camping for two nights before I climb to the summit. After the first night, I will climb part way up the trail to around 10,000 feet and then descend again for the second night. This should allow my body to acclimatize enough to summit the following day with hopefully minimal altitude symptoms.
Gear
While all this training should prepare me pretty well physically for climbing, every pound of gear I don't need to haul to the summit will make the going that much easier. So how do you pack light for a trip like this? My plan is to minimize weight where possible without going so far as to resort to an ultralight set up. Ultralight is a backpacking method where every ounce that can be shaved is done away with by using extremely light and minimalist gear. This lightweight approach is all well and good, but in mountaineering it is quite difficult to do away with some of the heavier items due to their essential nature when weather conditions go south.
Over the years I have learned that the best way to control weight without resorting to extreme measures is to simply limit or reduce the amount of gear you can take. There is often a tendency to bring every piece of gear "just in case" and so you end up with a stuffed pack that weighs a ton. My favorite technique for limiting the amount of gear I take is by simply limiting the amount of pack space available. To help me do this, I keep a minimum gear list that always comes with me no matter the length of trip. I then create a second list of additional items I will need that is specific to the trip length and terrain I will be encountering. Below I have examples of both the minimum gear list as well as a list for both my single and multi day climbs of Mt. Whitney.
Mountaineering Minimum Gear List
Mt. Whitney Single Day Trip
For my single day climb of the Mountaineer's Route, I will be using my Deuter Futura 32L pack (pictured left above). My biggest concern for a one day push is keeping the pack light. Every bit of weight I don't bring is that much less energy I will need to expend. However, I still need to balance staying light with the requirements for safely climbing the mountain. In addition to the minimum gear list, I will need the following items for the Mountaineer's Route:While all this training should prepare me pretty well physically for climbing, every pound of gear I don't need to haul to the summit will make the going that much easier. So how do you pack light for a trip like this? My plan is to minimize weight where possible without going so far as to resort to an ultralight set up. Ultralight is a backpacking method where every ounce that can be shaved is done away with by using extremely light and minimalist gear. This lightweight approach is all well and good, but in mountaineering it is quite difficult to do away with some of the heavier items due to their essential nature when weather conditions go south.
Over the years I have learned that the best way to control weight without resorting to extreme measures is to simply limit or reduce the amount of gear you can take. There is often a tendency to bring every piece of gear "just in case" and so you end up with a stuffed pack that weighs a ton. My favorite technique for limiting the amount of gear I take is by simply limiting the amount of pack space available. To help me do this, I keep a minimum gear list that always comes with me no matter the length of trip. I then create a second list of additional items I will need that is specific to the trip length and terrain I will be encountering. Below I have examples of both the minimum gear list as well as a list for both my single and multi day climbs of Mt. Whitney.
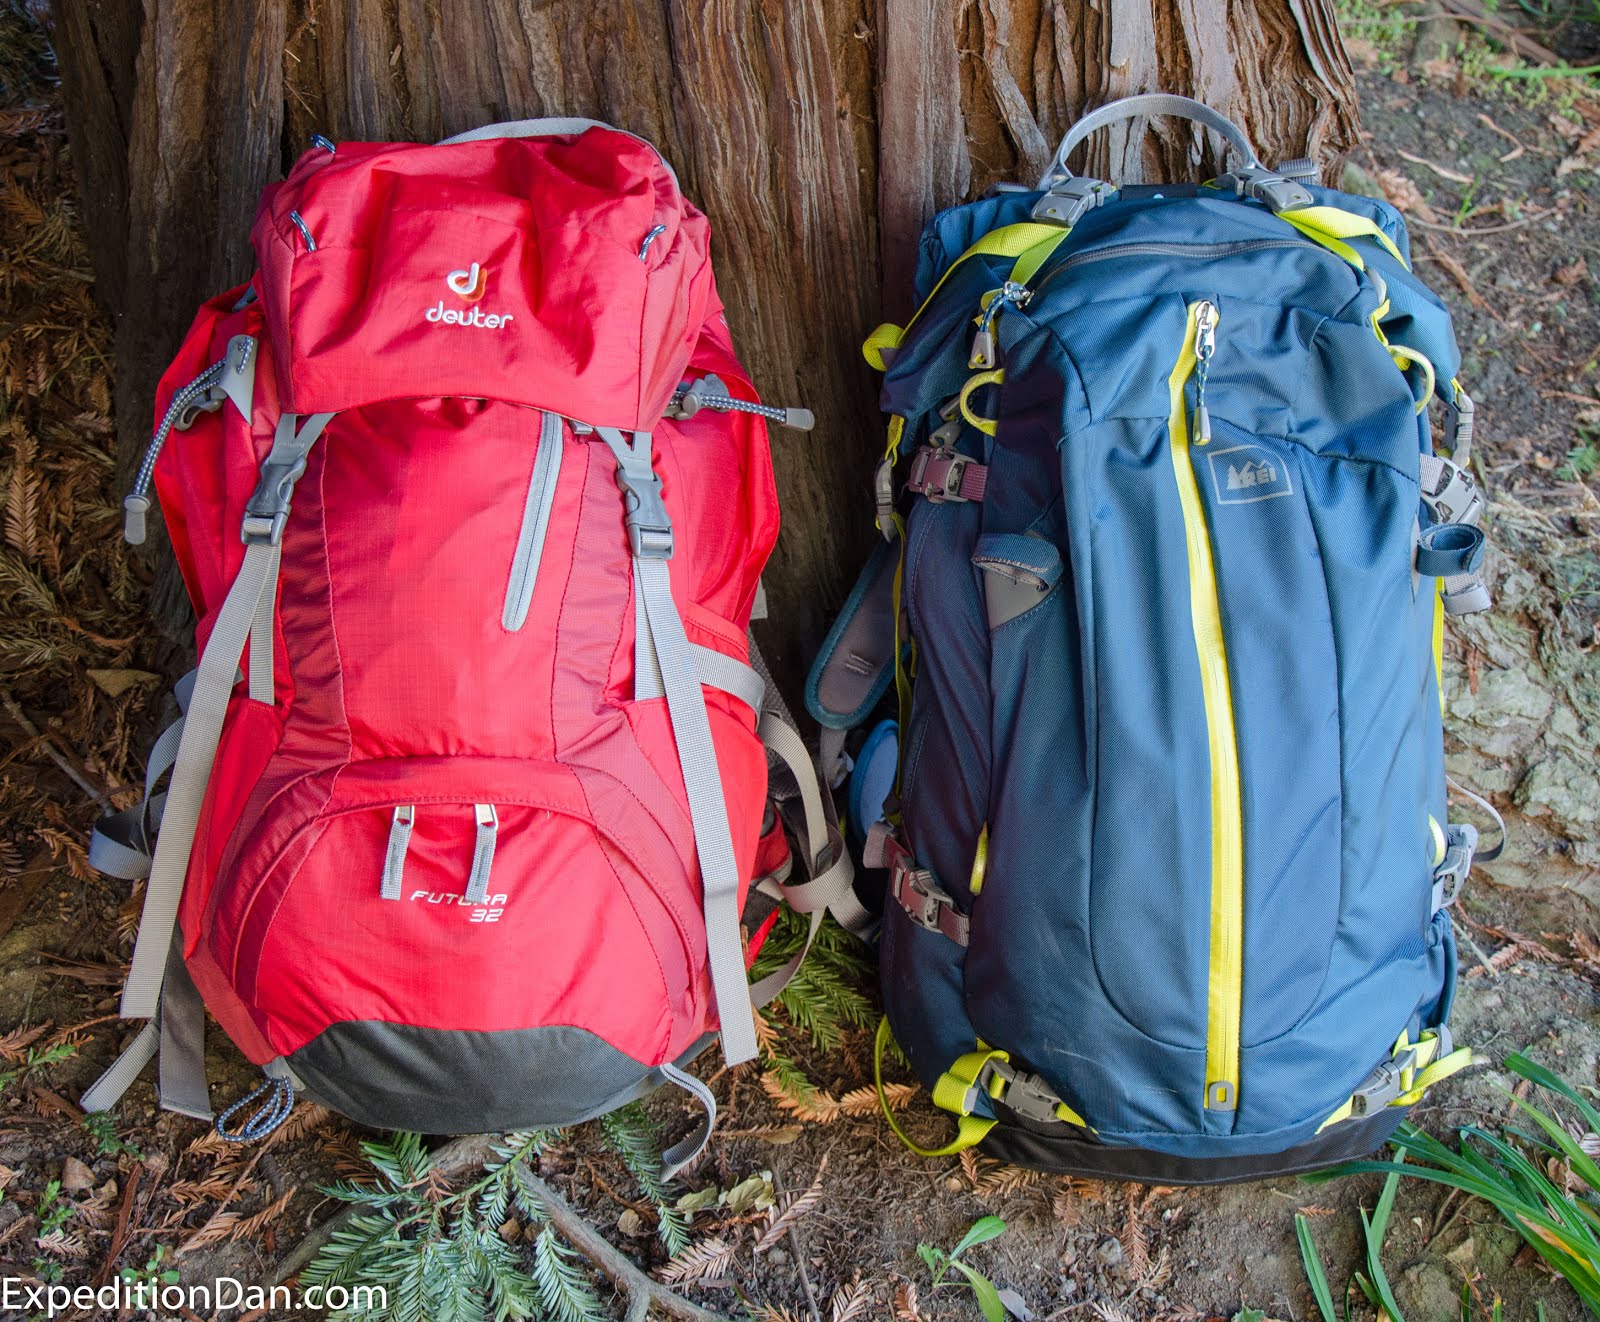 |
| My trip packs |
Mountaineering Minimum Gear List
- High top boots
- Long pants
- Wool socks
- Thermal underlayer
- Fleece or down jacket
- Thermal hat
- Waterproof gloves
- Long sleeve shirt (or arm covering)
- Brimmed hat
- Sunglasses
- Headlamp (w/ spare batteries)
- Rock helmet
- Leather rock gloves
- Water filter and Iodine tabs
- Sunscreen
- Food (~300 cal/hr)
- Water (.5L/hr)
- Knife
- Compass
- Paracord (50ft.)
- Trekking poles
- Map
- Backpack rain cover
- First aid kit
- Waterproof/windproof shell
- Rain pants
- Cameras
- Aspirin
Mt. Whitney Single Day Trip
- Gaiters
- Crampons (snowpack dependent)
- Small tarp (if rain is expected)
- Camelback bladder
- Water treatment drops (due to polluted water)
- Ice axe (snowpack dependent)
- Whitney zone permit
- WAG bags (required)
Overnight Trip
The overnight trip is going to be by far the more difficult of the two trips to pack light on. The addition of a sleeping bag, pad, and some shelter means there is simply more gear than on the single day climb. For this trip I will be using my other climbing pack, the REI Pinnacle 35 (pictured right above). While not much larger in terms of absolute internal volume (35L vs 32L), the Pinnacle has a more open internal layout that is better suited to holding bulkier gear like a sleeping bag and bear can. Since my dad is coming along on the overnight trip, we will have two packs to use for splitting gear that can be shared. In the list below, I note which items will be shared. This list is in addition to all the items from both lists above.
The overnight trip is going to be by far the more difficult of the two trips to pack light on. The addition of a sleeping bag, pad, and some shelter means there is simply more gear than on the single day climb. For this trip I will be using my other climbing pack, the REI Pinnacle 35 (pictured right above). While not much larger in terms of absolute internal volume (35L vs 32L), the Pinnacle has a more open internal layout that is better suited to holding bulkier gear like a sleeping bag and bear can. Since my dad is coming along on the overnight trip, we will have two packs to use for splitting gear that can be shared. In the list below, I note which items will be shared. This list is in addition to all the items from both lists above.
- Small ground tarp (shared)
- Sleeping pad
- Stove fuel (shared)
- Cup/bowl
- Small bear canister (shared)
- Sleeping bag
- Ultralight stove (shared)
- Cooking utensils
- Rain shelter (if rain is expected)
- Cooking pot (shared)
Now, you probably noticed we are not bringing a tent. We are doing this primarily to save weight and because sleeping out under the stars in the Sierras is a great experience. Of course, this assumes the weather will be good. In case of bad weather, we will probably lug along a lightweight shelter but I am hoping this is not required.
No comments:
Post a Comment